
It’s been a while since I’ve written up a List Archetype article for Age of Sigmar. I hadn’t been getting in as many games as I’d have liked and I’ve been experimenting with ideas in the games I have played without finding anything that really clicked. However, I’ve been fine-tuning this list for an upcoming event and feel that it’s in a place where I’m comfortable with it and that it does do some things that I’ve not written about on here before.
As ever, I’ll stress a few things before getting into the article proper. There’s an assumption of knowledge around some core rules for Hedonites in this edition of Age of Sigmar – you might find it useful to check out my Battle Traits Tactica from earlier in the edition as a starting point. As we go through, you’ll see that this is a list that suits the way I play and that might not suit everyone, however, hopefully talking through what it can do will provide some useful inspiration for your own lists and maybe even your own play.
Precision Control Invaders (2000 points)

Hedonites of Slaanesh
Invaders (10 Points)
General's Handbook 2025-26
Drops: 3
Spell Lore - Lore of Extravagance
Manifestation Lore - Forbidden Power (20 Points)

Battle Tactic Cards: Master The Paths, Restless Energy

General's Regiment
Glutos Orscollion, Lord of Gluttony (440)
 • General
Blissbarb Archers (300)
 • Reinforced
Scourge of Ghyran Slaangor Fiendbloods (300)
 • Reinforced

Regiment 1
Scourge of Ghyran Syll'Esske, the Vengeful Allegiance (200)
Daemonettes (200)
 • Reinforced
Fiends (150)
Symbaresh Twinsouls (120)

Regiments of Renown
Godmarked Ascendant (260)
Daemon Prince
 • Threnody Voicebox
 • Strongest Alone
 • 1x Wings


Created with Warhammer Age of Sigmar: The App
App: 1.25.0 | Data: 380
First things first, we’re using Invaders here, my love of Seeker Cavalcade and Retreat and Charge shenanigans is well known, but with no cavalry on the table here it was always going to be something else! Whilst part of me is always tempted to try and maximise Pretenders, the access to the additional Rend here from Ecstatic Revellers is just a stronger choice:
Battle Formation – Invaders – Ecstatic Revellers
Add 1 to the Rend characteristic of melee weapons used by friendly SYBARITE INFANTRY units while they are wholly outside friendly territory.
We’re not overflowing with units that make the best use of it, but the Twinsouls, Slaangor and Syll’Esske can all benefit. If push comes to a shove, the Blissbarbs can too but if they’re claiming the Rend boost in combat, that probably means I’ve gone for something incredibly opportunistic or, more likely, it’s all gone Pete Tong! Still, worth flagging as very occasionally 20 Blissbarbs are the combat threat you deserve if not the combat threat that you need!
The aim of this list is to deliver precision damage when and where it matters, either overwhelming a flank to create a scoring advantage or playing a positional keep-away game that avoids bad trades. I’ve said before in these list archetype articles that I’m quite happy to ensure that a game of Warhammer doesn’t ever threaten to break out, and this list very much leans into that instinct!
In practice, that means establishing a solid anchor, stretching the board with faster or more disruptive elements and then applying focused violence at exactly the right moment to collapse an opponent’s position. It’s rarely about tabling your opponent quickly. Instead, the goal is to strangle meaningful options in the early game before pivoting hard into late-game combat and scoring efficiency.
To understand how that works on the table, think of the army as five interlocking elements: the central engine, control pieces, scoring tools, primary damage dealers and our late-game pressure. We’ll start, naturally, at the centre…
The Engine of Indulgence
The heart of the list, just the one warscroll here, but it’s a big’un in more ways than one and it really defines the function of this particular archetype – controlling the tempo of the game and allowing the application of the precision elements that make up a key part of the rest of the list.
Glutos
Glutos’ warscroll remains one of my favourites, in this archetype, he isn’t just a powerful unit, he’s the metronome for the list, the leader of the dance and shapes the way everything plays out. His spell and abilities shift and impact the calculus of battle for both sides and dovetail beautifully with the core characteristics of the list. By Hedonites standards he’s incredibly durable and he’s the fulcrum that this particular list pivots on – establishing the centre, amplifying damage and really dialling up the pressure in the later turns.
His The Grand Gourmand aura provides a smorgasbord of buffs to speed, control, accuracy and rend for the SYBARITES in the list:
Glutos Orscollion – The Grand Gourmand
A different effect applies to friendly SYBARITE units each battle round whilst they are wholly within 12″ of this unit, as shown below. The effects of all previous battle rounds also apply to those units while they are wholly within 12″ of this unit.
Battle Round 1:
Starter: Add 1 to run rolls and charge rolls for those units.
Battle Round 2:
Main: Add 3 to those units’ control scores.
Battle Round 3:
Dessert: Add 1 to Hit rolls for those unit’s attacks
Battle Round 4:
Digestif: Add 1 to the Rend characteristic of those units’ melee weapons.
That these are cumulative means that in the later rounds Glutos really ramps up the level of buff that he’s providing to friendly units. As casualties begin to tell, the bonus to Control Scores makes him excellent at bullying onto objectives and stealing them from under your opponent’s nose. Obviously, the Digestif in Battle Round 4 doubles-down on the buff to Rend we’re getting from the Invaders’ Ecstatic Revellers rule – particularly as we’re hopefully not fighting much of the battle in our own territory. Durable heavy armoured units really need to beware in the late-game!
Gorge on Excess allows him to keep himself in fighting shape (as much as such a glutton could ever be said to be in fighting shape):
Glutos Orscollion – Gorge on Excess
Pick a friendly SYBARITE unit wholly within 12″ of the unit, Heal (6) the target
But keying off the SYBARITE keyword it can also be used to heal Syll’Esske or if needed one of the Twinsouls, Slaangor or even Blissbarbs (as somebody with a regular Nurgle opponent, sometimes I just really want to stop the chip-damage engine that is Disease).
Finally, Crippling Famishment remains one of my favourite spells in the game
Spell – Crippling Famishment – Casts on a 7+
Pick a visible enemy unit within 18″ to be the target, if cast, until the start of your next turn:
• Halve the target’s Move characteristic.
• Halve Run rolls and Charge rolls for the target.
Keywords: SPELL
I’d give serious consideration to any unit that had access to this spell just because of how key it often is to the way that I like to play Hedonites. On top of everything else that Glutos is already doing it’s just phenomenal. If applied right, you can gum up your opponent’s movement by slowing down screens, cutting the threat range of their heavy hitters or neutering their scoring potential by standing units away from objectives or targets. Even at close range, they’re going to need a minimum of a 6 on the charge roll to be able to make it – sure, they’ll make that on average, but it’s still a much greater risk of failure than normal and if you can extend the range further (with a well-timed Redeploy) you can leave them watching the battle unfold out of reach.
With Glutos establishing the tempo and anchoring the centre, the rest of the list can exploit the window he creates – stretching the board, isolating key units and overwhelming a flank of the opponent’s army with the precision application of the hammer and the scalpel!
The Temptation Toolbox
These are our surgical control pieces, here for manipulation, disruption and support rather than brute force – although both of these units are able to put their hand to some opportunistic violence too!
Scourge of Ghyran Syll’Esske
Syll’Esske operates as a flexible support piece in this list to help control the middle of the field. They provide a durable trading unit that enhances nearby SYBARITES and DAEMONS while being dangerous enough to threaten isolated enemy elements. They help to maintain the list’s momentum once it’s moved past the initial skirmishes.
Syll’Esske are the king and queen of keyword bingo! Starting with the keywords on their warscroll, they’re a SYBARITE, so they benefit from Glutos’ The Grand Gourmand aura and can be healed with Gorge on Excess. They’re also INFANTRY so they get the benefit of Ecstatic Revellers to further boost their combat potential which is already comparable to the average damage stats of a Keeper of Secrets.
They don’t just work well off their own keywords though, they help to make the list click together with their interactions with the DAEMON and SYBARITE keywords. Their Champions of the Gilded Throne ability is one I’d been desperate for us to get some access to somewhere:
Syll’Esske – Champions of the Gilded Throne
When players are alternating picking units to use a FIGHT ability, when it is your turn to pick a unit, instead of picking 1 unit, you can pick a friendly non-HERO HEDONITES OF SLAANESH DAEMON unit wholly within 18″ of this unit and a friendly non-HERO HEDONITES OF SLAANESH SYBARITE unit wholly within 18″ of this unit. Resolve the second FIGHT ability immediately after the first.
Hedonites are quite squishy and this can make multiple combats not a great idea for us. This means stuff that interacts with the order of activations can be invaluable but we don’t have many things that aren’t doing that on a dice roll. For example Fiends, with their Soporific Musk ability, requires a 4+, handing out STRIKE-LAST, Anything that adds a greater level of control over this area of the game really comes into its own. Chain Activation abilities are something we didn’t have any access to prior to this season and Syll’Esske brings a conditional one, granted, but one that we can rely on. In this list, it allows the chain activation of our Twinsouls or Slaangor and the Daemonettes or Fiends. Both units have to be wholly within 18″ of Syll’Esske so there is some positioning to take into account but it’s important just to stress the units don’t have to be that distance from each other so Syll’Esske could for example be central to two units almost 36″ away from each other. We also have some other rules in the army playing around with combat activation order but we’ll come back to those.
Syll’Esske also supports our units with their spell Wandering Minds:
Spell – Wandering Minds – Casts on a 6+
Pick up to 1 visible friendly non-HERO SYBARITE INFANTRY unit and up to 1 visible friendly non-HERO HEDONITES OF SLAANESH DAEMON INFANTRY unit to be the targets. If successfully cast, and you picked a SYBARITE target, subtract 1 from the ward rolls for damage points inflicted by its combat attacks, until the start of your next turn. If you picked a DAEMON target, it has WARD (5+) until the start of your next turn.
I love this spell, casting on a 6+ is always nice (particularly when you can potentially use Damned Conduit from the Fane to help) and having no range, only a visibility requirement, means we can potentially use this to help out units well away from where Syll’Esske is roaming! Both of the possible effects of this spell can be excellent. In the opposite order of the rule wording we’ll start with the part that affects a DAEMON unit, the INFANTRY keyword is also required (and we can’t pick Heroes) so that’s currently only Daemonettes, but they gain a 5+ Ward instead of the 6+ on their warscroll. This is quite a jump in the survivability of a notoriously squishy unit. We’ll talk about the uses for the Daemonettes when we come to them but it’s worth keeping our access to this spell in mind (and we will want to cast it quite a lot of the time in many match-ups!). The other half of this spell affects a SYBARITE INFANTRY unit – there are a few more of those but in this list that’s our Slaangor and Twinsouls (plus our Blissbarbs at a push), whilst the spell is active that unit worsens the Ward Saves of enemy units that take damage from their combat attacks. With the overlapping buffs we can stack from EUPHORIC, Sadistic Spite, Ecstatic Revellers and The Grand Gourmand, this allows our units to more reliably eliminate their targets!
Syll’Esske’s final rule to mention is Violent Offerings:
Syll’Esske – Violent Offerings
At the end of any turn, if any damage points were allocated to an enemy WIZARD or PRIEST by this unit’s combat attacks this turn and that enemy unit has been destroyed, add 1 to this unit’s power level for the rest of the battle. This unit can be affected by this ability multiple times and the effects are cumulative.
Situational but worth highlighting before we talk about the role that Syll’Esske plays in this list. Their primary purpose is as a support piece to ensure that we get the overload we’re looking for and that our units get to hit as hard as possible before casualties hamper their output. They’re usually found hanging near to Glutos but more than capable of leading a flank. You’ll want them near the Fiends, Twinsouls and Daemonettes more often than not to make the best use of their activation shenanigans (and to keep Syll’Esske safe too). Their damage output means they can also bully isolated elements of the enemy force or in support of other units in this list, a poorly placed support character is a juicy target for Syll’Esske and if you can trigger their Violent Offerings rule as a bonus then even better!
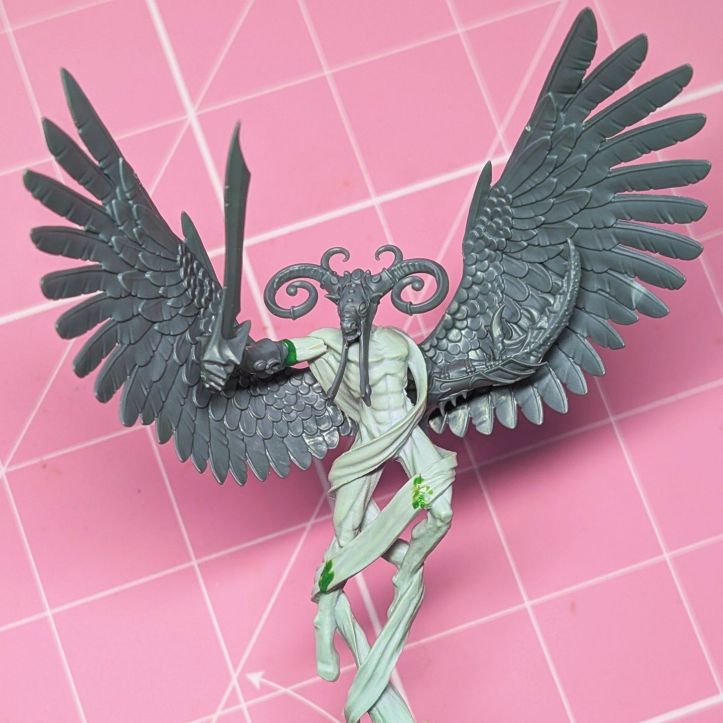
Daemon Prince
Not a unit I’ve made a great deal of use of in Hedonites so far. As part of our toolbox, the Daemon Prince operates as a fast utility scalpel. His speed and manoeuvrability (thanks to flight) allows him to pressures exposed heroes, steals distant objectives, and switch off key abilities at pivotal moments. He thrives on opportunism, punishing positioning mistakes and forcing opponents to screen more cautiously than they’d like.
The Daemon Prince comes at the cost of an additional Regiment (The Godmarked Ascendant Regiment of Renown – which gives him the HEDONITES OF SLAANESH keyword and +1 to Run rolls and Charge rolls) but he adds some additional utility and he’s the fortunate recipient of our Heroic Trait and our Artefact of Power. We’ll start with those as they go someway to explaining how we’ll use him. For the Heroic Trait we’ve got Master of Temptation:
Heroic Trait – Master of Temptation
You can only use this ability in the Enemy Hero Phase if your opponent has any Temptation Dice. Pick a visible enemy unit within 18″ of this unit to be the target. For the rest of the turn, while your opponent has not used any of their Temptation Dice to replace a roll for the target this turn, the target can only use CORE abilities.
It’s situational and the timing matters but this has the potential to cause a lot of aggravation if well placed. First thing first, it triggers in the Enemy Hero Phase so it’s after they’ll have cast all their spells etc. The first opportunity to spend a Temptation Dice is usually a Run roll in the Movement Phase. This is where the pressure lies as they either they burn dice inefficiently and potentially switch off charges or accept that a key piece is partially switched off. There are lots of rules that lack that CORE keyword and I’ll not list them here but RAMPAGE abilities are a big one, as are abilities like Soporific Musk on Fiends should you find yourself in a mirror match.
For our Artefact of Power we’ve got the Threnody Voicebox:
Artefact of Power – Threnody Voicebox
For the rest of the turn, subtract 1 from the Attacks characteristic of melee weapons used by enemy units while they are in combat with this unit.
This is a defensive tool should the Prince be caught out or to keep him safe when making one of his opportunistic charges. Sadly it’s only once per battle but it may be enough to keep him (or a friendly unit in combat with the same target) safe!
On his warscroll the Prince brings one of our abilities that can impact the Combat Activation order in Immortal Champion:
Daemon Prince – Immortal Champion
Roll a dice. On a 4+, this unit has STRIKE-FIRST for the rest of the turn.
It’s a coin-toss for this going off so we can’t rely on it but neither can our opponent rely on it not going off so it has some defensive value also. In a perfect world we’re going first with our Prince, making something go last with the Fiends and having our Daemonettes and Twinsouls go at the same time to enjoy a level of multi-combat threat that Hedonites can usually only dream of – we don’t live in that perfect world, so don’t bank on those all going to plan but certainly some utility to be had from the ability.
Otherwise, one last thing to point out about his warscroll, is that the Prince’s attacks have Crit (Mortal) built in so we’re not dependent on Sadistic Spite to hit the Prince’s full threat potential into heavily armoured targets but we may still find use from them being EUPHORIC for the ability to Run and then Charge (with +1 to each remember) or for Crit (2 Hits) into squishier targets where you need a little more mathematical certainty! You’re likely only picking on weak targets so may not need this but again, useful to have in your back-pocket.
In the list, the Prince could have been swapped for another trading unit, but what he brings instead is reach and disruption. I feel like the army has enough presence in the middle of the board already and instead benefits more a fast independent operator that can exploit gaps and create pressure where the opponent doesn’t want to have to commit resources.
Controlling the Table
These are the units and tools that allow us to control the board, stretching things where required, blocking elsewhere and providing additional support to help the overall battle plan – this constitutes one of our units, our Manifestations and our Terrain Piece.
Blissbarb Archers
Is it even a real Hedonites list without Blissbarb Archers? Our reinforced unit plays a critical role in how the list controls space. They’ll often operate independently, away from where the main hitting power is concentrated. However, Blissbarbs provide plenty of hitting power of their own and this is where they really help stretch the play. There aren’t many armies that can afford to leave Blissbarbs pinging away at their units at close to maximum range so your opponent is going to have to direct resources to taking them out and you’re trying to force them to do so. I’ll often pull these away from where the lines of battle collide, looking for targets of opportunity or attrition whilst ensuring that we maintain our scoring momentum as one of our units that are comfortable doing all of their work from afar. Understanding realistic threat ranges of enemy units is key to using these well to ensure you’re putting the pressure on the enemy and drawing threats away from the main force whilst keeping the Blissbarbs safe for as long as possible. However, it’s in the early turns of the game that these guys will likely do their most valuable work and to help reduce threats and score before the rest of the force is ready to commit. They are rarely the unit that wins the game outright, but they are often the unit that forces the opponent into losing it.
Forbidden Power
I had a few different thoughts on the manifestations for the list.
For a lot of this season I’ve ran Aetherwrought Machineries as it provides a useful toolkit for a very reasonable 0pts! Not to say that Cogs couldn’t make Glutos even more annoying to deal with and that the Aethervoid Pendulum couldn’t do some of the board control work that we’re looking for from the Manifestation Lore my choice eventually boiled down to Forbidden Power due to just how much space the Manifestations can occupy on the board and the utility that the spells can provide against some of my least favoured match-ups.
The Shards of Valagharr are great for blocking the space your opponent wants to occupy to get his teeth / claws / swords into your Blissbarbs and as an extra added bonus they shut off Fly abilities and any abilities that allow for units to be set up within 9″ of either part of the Manifestation. From bitter experience, these sorts of abilities are usually what put my Blissbarbs at most risk. The Shards can be used more aggressively also to try and stop your opponent bringing in their own manifestations where they might upset your plan or to zone out Kharadron and Tzeentch players from sections of the board.
The Soulscream Bridge does a similar job to the Shards as far as occupying space, but it also allows for a quick redeploy of resources. Often, this is my get-out-of-jail card for the Blissbarbs, should they be engaged, the survivors can be teleported out of combat without sacrificing their shooting and then a Rally or two later, they’ll be back to annoy my opponent further.
Lauchon allows us to move Syll’Esske around a little quicker than normal, particularly when you apply some 40k-esque Disembarkation style tactics to the 3″ at the beginning and end of the move. Meanwhile the Horroghast provides some additional anti-infantry shooting and can cause some issues for your opponent on the odd occasion it causes enough casualties to trigger its Harbinger of Horror ability – in practice, these are secondary tools. I’m far more likely to use my casting attempts for Crippling Famishment, Wandering Minds, Sadistic Spite and/or Overwhelming Acquiescence most turns and then Shards and the Bridge tend to answer a particular problem when it looks like it may arise.
The Fane of Slaanesh
Our scenery piece sits best here. Mainly, it’s supporting Glutos and Syll’Esske to get their spells through. This means thinking ahead a little in the deployment phase and popping it somewhere where it’ll be useful for them in the mid-game but balancing that with not making it an easy way for your opponent to get a charge off and then push on into your units.
Together the Blissbarbs, our Manifestations and the Fane ensure the army is rarely fighting on unfavourable terms and shaping the board long before the decisive combats begin.
The Main Thrust
As much as I would like to avoid it, eventually, some Warhammer is likely to break out – but what we want is for it to be on entirely our terms and if we can, for it to weighted heavily in our favour. There’s only one unit in this section but they’re the primary way in which this list reaches out and causes some pain although it’s important to think of them as a scalpel rather than a hammer…
Slaangor
The Slaangor are our primary threat in the list, but they also play a couple of other important roles in how the army gains control of the board and tempo of the game. The first of these starts in the Deployment Phase. My philosophy is that you should always assume your opponent will make all the right choices when you’re thinking about how to make an army work – however, what I believe you also want to do, is present them with as many choices to make as possible, increasing the likelihood that they miss the correct one somewhere. Just as a quick aside, I’m not talking about gotcha moments or hoping they forget key rules – I think it’s on you as a player to try your best to ensure your opponent has all the variables around your army that you know better at the forefront of their minds when they’re making a decision – but often, victory will come from pouncing when they make the wrong one, or, even better, when even the right choice is far from optimal. That’s what I think Slaangor ambush brings to the table, particularly with the Slaangor being a very real and known threat nowadays. Unless they’re running a horde army that can screen out half the board, you’re forcing them to make sub-optimal choices around where they want to risk those Slaangor running amok thanks to the Bestial Onslaught rule:
Slaangor Fiendbloods – Bestial Onslaught
In any Movement Phase, pick this unit if it is waiting in ambush. You can set it up on the battlefield wholly within 9″ of a battlefield edge and more than 9″ from all enemy units.
The psychological impact of this is huge and forces your opponent to have to react in some way. I’ve been playing a fair bit with Slaangor ambush in my recent games and I think I’ve probably gotten this wrong as often as I’ve gotten it right up to now – but try not to rush to bring the Slaangor on unless there’s a target of opportunity that you can exploit or you need to force your opponent to react to a threat that will drag them out of position early on. Often, these are coming on somewhere where they’ll force an overload to collapse the lines or to pick off a unit that thought itself safe away from the line of battle and that will force your opponent to have to redirect to head off any further threat from your angry goats.
The other area in which they help enforce the control and tempo elements of the army are through their Instinctive Advance rule:
Slaangor Fiendbloods – Instinctive Advance
Once Per Phase (Army) after your opponent has declared a Command for a unit within 12″ of a Slaangor Fiendblood unit, immediately after that command or the ability that it was a reaction to has been resolved, this unit can move 3″. It can move through the combat ranges of enemy units and can end that move in combat.
IIn practice, this is one of those rules that often functions as a deterrent. My opponent declares a Command, I remind them the Slaangor can move, and suddenly a 3″ shift becomes disruptive and they change their mind. Out-of-sequence movement is frequently more powerful than raw damage, allowing you to change their plans or punish attempts to leverage any advantage by putting something new under threat or moving your Slaangor somewhere safer.
Their combat potential is pretty devastating on the charge with the boost to their damage, particularly when you can layer the buffs that our army, characters and the combinations with their SYBARITE keyword allow.
Winning The Long Game
The units in this section tend to have a few roles to play in the army depending on timing and the board state. They help us to ensure we’re only fighting combats when its advantageous and that we’re more likely to reap the rewards of doing so. They’re also how we convert any advantage we do gain over the opponent into victory points to actually win the game.
Fiends
There’s an argument for the Fiends belonging elsewhere in the breakdown of this archetype, but in reality, they’re probably the embodiment of these jack-of-all-trades units. First and foremost, they’ll start many games as a screen, protecting some of the squishier elements of the list (looking at you Daemonettes) from any alpha-strikes as these units work best as our counter-punch but we need them alive to do that.
From there, the Fiends pivot into a role focused around disruption and controlling the tempo of combats. We’ve alluded to their Soporific Musk rule a few times already:
Fiends – Soporific Musk
Pick an enemy unit in combat with this unit to be the target. Roll a dice. On a 4+, the target has STRIKE-LAST for the rest of the turn.
Whilst again a coin-toss, this coupled with the fact that Fiends aren’t slouches in combat means that your opponent is taking a risk on any combats where the Fiends might be dragged in. Coupled with the Prince’s access to STRIKE-FIRST and the Champions of the Gilded Throne rule on Syll’Esske there’s a real risk to any plans your opponent makes that involve them charging into combats where these units are able to have an influence.
The Anti-MONSTER (+1 Rend) rule on their attacks means they can put smaller monsters and monster characters at risk and even without it, whilst swingy, their attack profile is respectable enough to mean they can punish any over-extension by your opponent but ideally, the Fiends probably aren’t having too many fights on their own. Their value comes from allowing your units to trade-up in the combats that they have.
Don’t forget Disruptive Song either:
Fiends – Disruptive Song
Subtract 1 from casting rolls and unbinding rolls for enemy WIZARDS while they are within 12″ of this unit.
Coupled with the Fane’s boost to Cast and Unbind rolls, there’s a surprising amount of control over your opponent’s magic (and magic defence) that you can extend with the list.
Twinsouls
If points weren’t a factor there’d be second unit of these or I’d reinforce the current unit. Twinsouls are a lovely little multi-function unit, able to act as an anvil to take the sting out of heavy-hitters looking to get into your lines and able to trade up, particularly in lists like this one where their SYBARITE keyword allows them to maximise the offensive buffs that the list is able to hand out.
Often screening initially before looking to bully vulnerable units and create lopsided combats that work in our favour the two rules that Twinsouls thrive upon are both triggered by being on the receiving end of a charge or caught in an ongoing combat and both are buffs to their defence. The first, Ego-driven Excess also supports friendly units caught up in multi-combats with them:
Twinsouls – Ego-driven Excess
If this unit did not charge this turn, subtract 1 from the Attacks characteristic of melee weapons used by enemy units while they are in combat with this unit.
They also become slightly more tanky in these situations thanks to their Fiendish Reflexes rule:
Twinsouls – Fiendish Reflexes
If this unit did not charge this turn, it has WARD (5+) while it is in combat.
One thing I always flag, as much to remind myself as anyone else, is that the Ward applies whilst the unit is in combat and not just for attacks it receives in the Combat Phase.
Daemonettes
Last but by no means least, our Daemonettes are here as a primary trading, area denial, screening, scoring and connective unit helping us to ensure the pressure the list can exert is felt across the board. As DAEMONS and INFANTRY they’re going to tend to keep within support range of Syll’Esske as they really benefit from the Champions of the Gilded Throne ability and the Wandering Minds spell.
They’re a delicious counter-threat unit as they can really apply a great deal of hurt, thanks in part to the buffs available from EUPHORIC and Sadistic Spite (especially if combined with Overwhelming Acquiesence) and their Lithe and Swift rule:
Daemonettes – Lithe and Swift
Add 1 to the Attacks characteristic of this unit’s Piercing Claws for the rest of the turn if this unit charged in the same turn.
This can allow the Daemonettes to punch well above their weight and makes them a threat that must be respected. Meanwhile, as a reinforced unit they bring numbers and with their STANDARD BEARER and MUSICIAN (oddly rare in Hedonites) they can play an objective control role and even provide some light attrition (by squishy Hedonites standards anyway).

Some Thoughts on the Archetype In Practice
So having seen the units in the list and some of the rationale for why they’ve been selected and the roles they have to play I wanted to finish with a few thoughts on a few areas of practical application with the list, namely: Deployment, use of the EUPHORIC keyword and some areas for further consideration that you may want to experiment with if building your own list from this archetype.
Deployment
Three regiments to allow me to draw out some information before committing the primary damage dealers. Usually Glutos and the Blissbarbs set out the intent early with holding the centre and creating the sense that I might spread out across the deployment zone with the Slaangor held in Ambush to put some questions in my opponent’s mind as early as possible around whether they need to screen them out etc. The Daemon Prince gives very little away with his deployment but he’ll usually start nearer to the centre but probably out towards the Blissbarbs to continue the pretence at a wide front. The final drop – Syll’Esske, Fiends, Twinsouls and Daemonettes is where the refused flank approach becomes clear, by that point my opponent will have already made two or three drops so will have limited opportunities to react to that.
I’ve included an example deployment map below just to give an idea of the approach I might take to deployment with the list. I’ve gone for a Bountiful Equinox style map for this example but obviously the plan would impact this greatly:
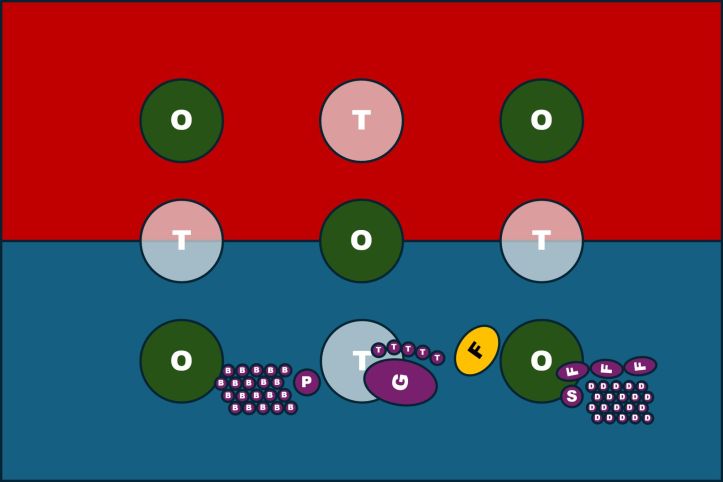
In practice I often deploy slightly more conservatively than this diagram suggests, particularly into armies with significant deep strike or ambush potential. The aim is rarely to rush forward early, but to establish a safe board presence whilst denying space behind the army. Hopefully you’ll notice that there’s a conscious decision around what is screened and what it isn’t. I will happily concede empty space on one flank or in front of the line if necessary, but I’d be extremely reluctant to allow meaningful enemy units to appear behind its core. Maintaining a stable centre and protecting the pieces that control the tempo of the army is far more important than covering every inch of the board.
Things I’d consider when deploying though are:
- Who will have the choice over Priority for Turn 1?
- What Deep Strike or Ambush threats does my opponent have and when will they emerge?
- How does it benefit me to lead the scoring early or am I better leaving objectives clear to ensure I’m the Underdog early on?
- Where does the Fane need to go to be safe (and not to expose me to an early charge) but still be useful in the crunch turns of the game?
- Where is my opponent’s army vulnerable? Where is their power concentrated and how can I limit the impact of that?
Deployment has always been one of the most crucial phases in Warhammer, in this archetype, we’re not looking for blanket coverage but instead purposeful asymmetry to help us get the fights that we want.
Euphoric Killers
One of the biggest challenges with playing Hedonites well is trying to manage the risk and reward trade-off between the benefits of the EUPHORIC keyword on your units and the risk that your opponent having a fistful of Temptation Dice can pose. In a control-leaning list like this, excess is best enjoyed in moderation! Therefore, I tend to be quite conservative in the early rounds of the game and this list is quite comfortable with that approach as not everything needs to be “On” all at once.
Often my Blissbarbs are the sole beneficiaries of this until such time as the Slaangor have arrived and are ready to bring the violence – and hopefully the threat of the Temptation Dice is lessened by the removal of lynchpin units in my opponent’s army and/or there not being any long-bomb charges that they can suddenly make with that intervention from the capricious dice gods! In the later turns though any and all of the Slaangor, Daemonettes and Twinsouls often become key candidates for the benefits of EUPHORIC but if kept relatively safe, the sheer output of Blissbarb Archers in their own turn and your opponents (through Covering Fire) mean that they can often stay at the front of the queue. Don’t be afraid to use it on the characters either, none of them are necessarily full-blown hammers in this list but the additional manoeuvrability that the rule provides can really allow them to dial up the pressure or provide further support where needed.
Food for Further Thought
I thought it’d be useful to provide just a few bullet points on some evolution of the list up to this point and/or key areas I’d consider exploring first if looking to make tweaks to suit the way you play the game (or to future-proof the archetype slightly as we draw nearer to the end of this season in the Mortal Realms)
- One thing that took a bit to really hit home for me was that sometimes, the Slaangor just won’t get to come on in the most exciting spots with their ambush. I think the first few times I used them (not just with this list type) I was so adamant on setting up at the rear of the board that I missed opportunities to reinforce my line elsewhere or to deal with perhaps slightly less obvious targets but that the rest of my army wouldn’t be able to reach without significantly redeploying and therefore the value of the Slaangor ambush could be multiplied from a positional sense if not from a trading them into something more obviously valuable sense. I learned that lesson the hard way in a mirror match against the excellent Andrew Charlton – they’d dropped into his territory to threaten his support characters but it quickly became apparent that the rest of my list couldn’t get hold of his Blissbarbs and so they spent a turn having to get into position to deal with that less attractive but no less crucial target. Just as a quick note, Andrew really turned me back on to Master of Temptation with the way he expertly shut down a few key abilities for me in our game, including on my Fiends’ Soporific Musk – I shared that observation before out of painful experience!
- The Daemon Prince’s role in the list has evolved with some practice games. Early iterations of the list saw him running with Strongest Alone and the Pendant of Slaanesh but creating points for the Manifestations put paid to the Pendant and I found I wasn’t feeling that Strongest Alone was tipping my hand as far as throwing him into combats – again, no secret in these articles that positional control is my preference rather than aggressive alpha attacks but, there’s potentially something in the manoeuvrability of the Prince coupled with that aggressive combo of Artefact and Heroic Trait in the right hands.
- You could lean more actively into the SYBARITE side of this list and further leverage the Ecstatic Revellers rule with a greater number of Twinsouls or introducing some Painbringers perhaps. I think that change potentially shifts you away a bit from this archetype as you quickly get less value out of Syll’Esske if the Daemonettes AND Fiends aren’t present but there’s certainly avenues that could be explored with Sigvald, a Lord of Pain or even a Shardspeaker coming in for a more budget option to play a slightly different role.
Ultimately, the Precision Control Invaders archetype isn’t about overwhelming force, it’s about narrowing the game until only the fights you want remain. If you enjoy dictating the tempo, forcing uncomfortable decisions and applying overwhelming force to collapse a flank of the opponent’s army, this archetype may be worth exploring.
Is this an archetype you want to try out? Have you used something similar before, if so, how did it go? Always happy to get feedback on your experiences with these and on what you’d tweak or adjust to make it suit your own playstyle.
Discover more from Oath of Moment
Subscribe to get the latest posts sent to your email.
