


The recent balance update made some changes for Hedonites of Slaanesh, some good and some not-so-good, however on the balance it was mostly improvements for us, I think. Let’s have a look at the changes first and what they mean and then after that we’ll have a look at a new list archetype that I think the changes might encourage a bit more than previously.
This Hedonites of Slaanesh Tactica is part of a multipart series you can find the other posts here – it probably makes sense to read Part One about the Battle Traits as a starting point and then return here afterwards – although since the Balance Update, not everything will be fully up to date!
Part 1: The Battle Traits
Part 2: List Archetype – Control Shenanigans
Part 3: List Archetype – Daemonic Recursion
Part 4: List Archetype – MSU + Changes from the Balance Update
Also, a note on List Archetypes (for when we get to that bit shortly) probably important to make this clear: I’m not saying this list is going to win tournaments. It’s more about exploring a play-theme or style that can be built from the Index and seeing what are the combinations that work within that style. Equally these are not meant to be meme-lists. Hopefully, they will serve to get you thinking – the main reason I write these is they really help to get me thinking about the synergies available to the armies that I play. A great list will probably draw on some elements from a couple of the List Archetypes looked at here (or more besides). Hopefully, by the end of this piece you’ll have some ideas of other synergies or even better approaches – please share them in the comments section if you do, as always keen to see how other people build their army lists! Anyway, back to this post proper…
So about those changes! One of the biggest changes for Hedonites is in our Battle Trait where the second half of Excess of Depravity has been updated. As a reminder, the first half of this rule is as below:
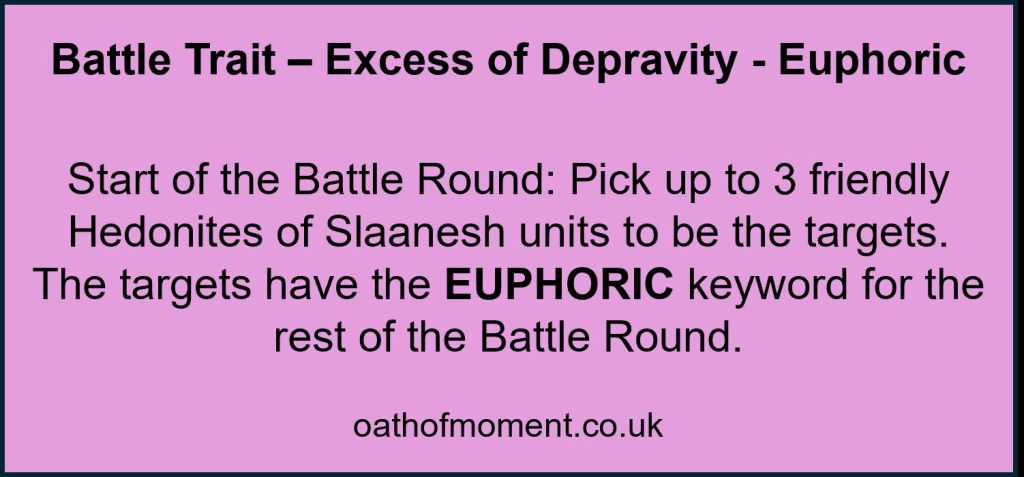
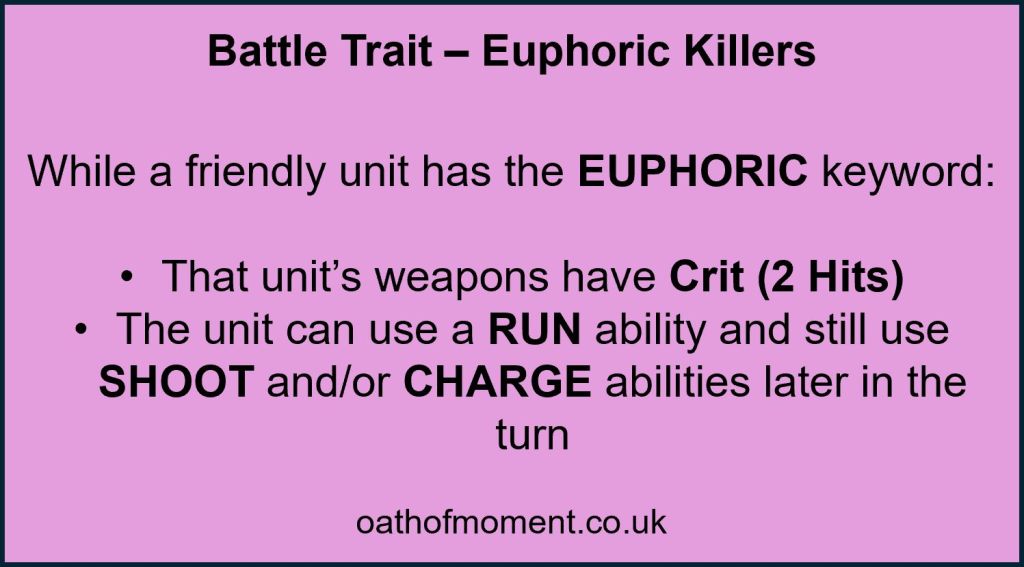
The Euphoric keyword is quite powerful
The change comes in the inherent downside for the Hedonites player in choosing Euphoric units:
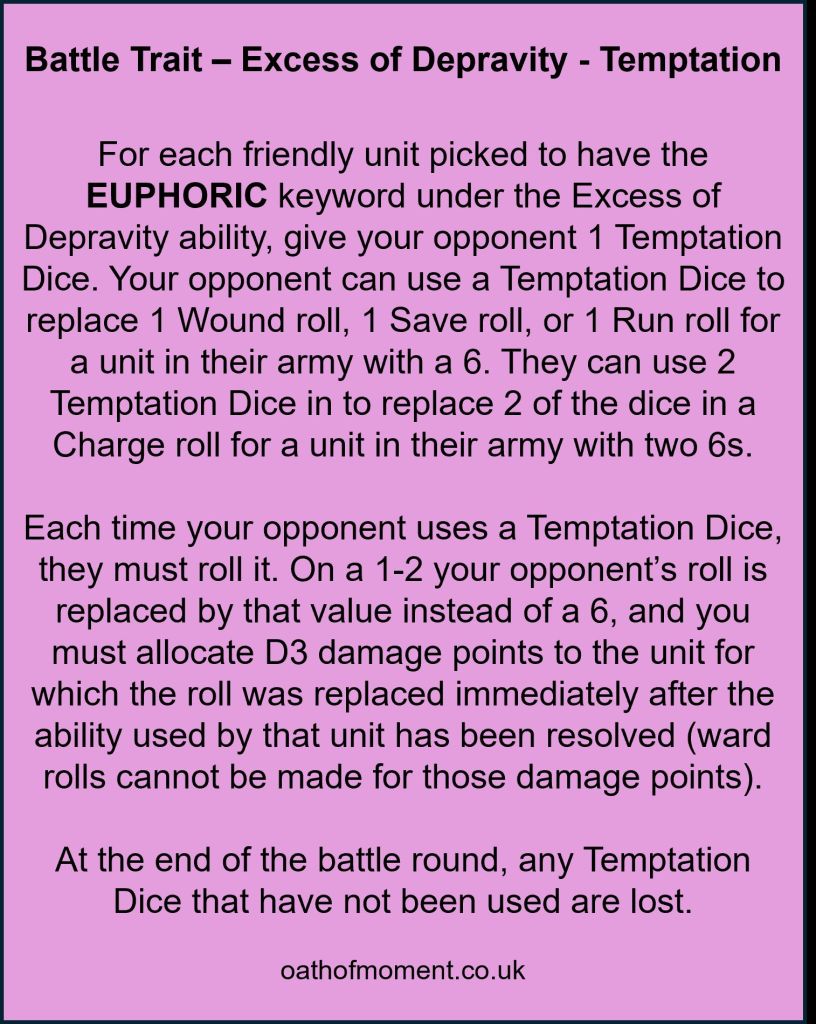
The big change here is that it’s no longer a clear-cut bonus for your opponent with the dice. The previous tiny occasional downside of some Mortal Wounds alongside the massive upside of guaranteed 6s has been tweaked. Rolling a 1 or 2 means that your opponent now takes the damage (no Wards allowed) and their plan to swap in a 6 is scuppered.
There was also a minor change in the main Rules Update that has a profound effect for Hedonites of Slaanesh

This small change fairly radically shifts the balance of risk onto the opponent when it comes to using the Temptation Dice. No longer can they roll their charge to see if they get what they need and then swap in the dice for essentially a free and better reroll. Now they must decide if the increased chance of success outweighs the risk of failure, especially with failure carrying a greater risk in itself.
This is by no means foolproof, but at least now, for every 3 Temptation Dice your opponent uses, on average, one of them should work against them. They also don’t know if they would have made the roll they’re swapping before they choose to use the dice. A 6 is always great. But a 3+ that causes you D3 wounds you can’t stop if you fail it… That doesn’t feel as clear cut. Making it more of a choice for your opponent ultimately increases the chance of them making the wrong choice and that’s usually going to be a positive for us, the Hedonites player.
This does also mean it’s now a little less daunting to make more than 1 unit Euphoric but you’re still going to have to weigh up the benefit of doing so against the risk of your opponent having extra chances at a 6.
There were also some changes to other rules that affect Hedonites. One of the main ones to flag is the change to the Honour Guard rule if you pick Priority Target.
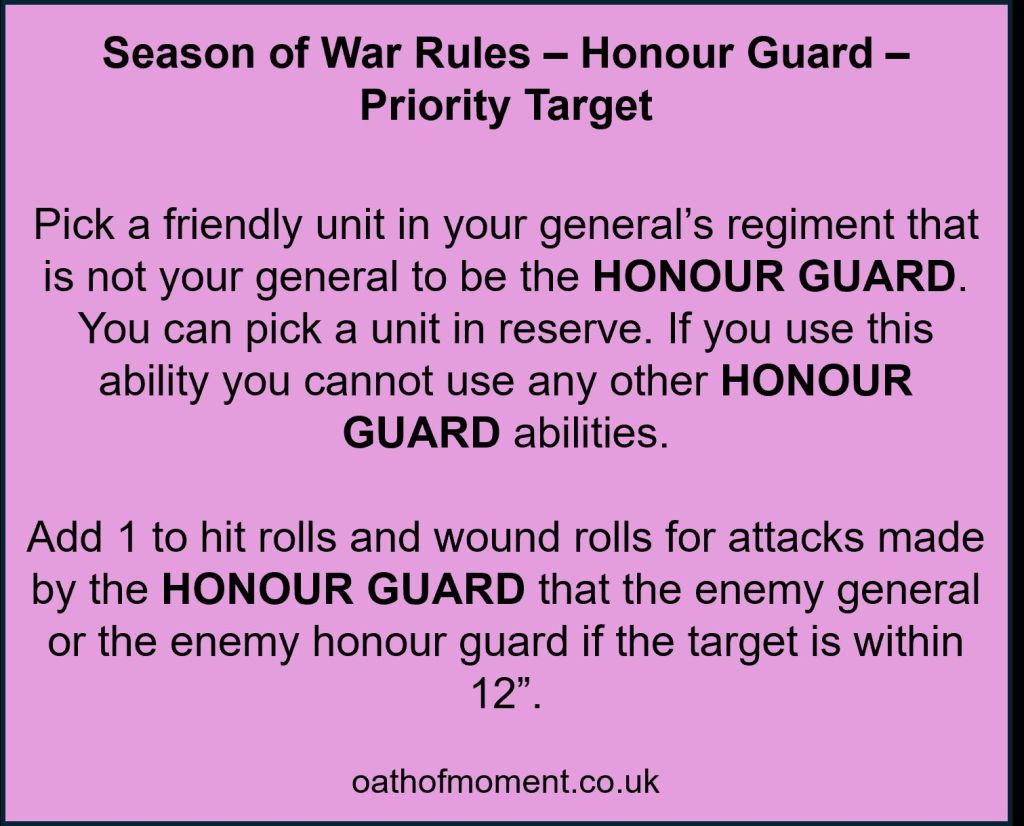
Previously, it covered the whole of the enemy General’s Regiment and didn’t have the restriction to short range this was a great choice for a unit of 20 Blissbarbs to just really ramp up the damage they could deal out. There’s still some play in that, but reducing the number of possible targets and having to get within charge range to get the bonus makes this less attractive on Blissbarbs over picking Bodyguard on Twinsouls say…
This leads us neatly to another list archetype that I think this balance update leads me towards. If you’ve been reading these list archetypes since the beginning you’ll have already seen the Control Shenanigans list. This one has some things in common with that but is leaning further into the MSU style.

If we zoom out just a second and talk a little bit more broadly as ‘Googling’ MSU in Warhammer gave me a surprising number of different definitions, so I just want to be sure we’re all working to the same meaning for the purposes of this post. Multiple Small Units (MSU) type armies are pretty much what it says on the tin. For the purposes of Age of Sigmar, this is probably units that haven’t been reinforced and that we have a number of. I’ll come back to why I said probably there shortly. MSU works on a few principles. Firstly, that you’ll likely have more units on the board than your opponent. This gives you scope for having more units to send to objectives whilst also completing Battle Tactics, and screening your opponent’s units out. Secondly, because you have a number of units and they’re of relatively equal value or importance there are less clear targets for your opponent and less opportunities for them to get value out of their big scary reinforced units. 6 Varanguard on the charge are terrifying and removing a great many things. 6 Varanguard really don’t want to be wasted on screen after screen… But if that’s all you have…
Age of Sigmar has a few features that support this play style and a few features that work against it.
- Control Score modifiers: These are added to a unit’s combined Control Score. So if you have an ability that gives all friendly units in range +3 to their control score the a unit of reinforced Infantry 10 strong are worth 10+3=13. Two units of 5 Infantry both in range of this same ability are worth (5+3)+(5+3) = 16.
- Unit Champions: The most cost-effective model in the majority of units is the unit champion as they usually have an extra attack compared to their comrades. Again a unit of reinforced Infantry 10 strong with one attack each has 1 unit champion and therefore 11 attacks. Two units of 5 have (5+1)+(5+1) = 12. Those two configurations cost the same. We could also talk about Musicians and Standard Bearers here but quite a few Hedonites units (the newer stuff) don’t have those sadly.
- Counter-Charge and Power Through: One of the principles of MSU is that your opponents’s big scary reinforced units can only deal with so many of your units in a turn because they can only be in one place at once and your opponent only gets 5 turns of their own. Counter-Charge somewhat messes with this principle as it gives your opponent a chance to charge out of sequence, so if they can keep the Command Points to do this and they position themselves accordingly, there’s the chance for up to an extra 5 charges over the course of the game! Power Through also mitigates some of the issues of screening units being just tough enough to pin something in an unwanted combat for longer than hoped or waste a turn retreating as they can break out of combats without having to Retreat.
- 3″ Engagement Range and 3″ Reach: Positioning can be really tricky as you’re in combat within 3″ of an enemy unit and units in combat or that charged can make a 3″ pile-in. This means if you’re trying to feed enemy units that scare you all your screens, then you need to get their placement right as there’s a lot more opportunity for your opponent to use your nearby units to help catapult them into the combats they want rather than the ones you want.
- Regiments and Priority: Reinforced units tend to be better for Regiment Economy. This is maybe more of a thing now with the change to Priority Target meaning there’s less risk to stacking your General’s Regiment and potentially reducing the average number of drops in armies. If you’re going MSU you’re probably looking at at least a few Regiments.
So there are pros and cons. Overall it does feel that AoS is slanted towards big reinforced units duking it out but MSU definitely has some play.
In the context of Hedonites there are a few things that support this further and we’ll explore some of these through the list archetype: Many Slaaneshi Units
Many Slaaneshi Units (MSU) (1950 points)

ARMY

Hedonites of Slaanesh | Seeker Cavalcade
Drops: 2
Spell Lore - Lore of Extravagance
Manifestation Lore - Aetherwrought Machineries

General's Regiment
Glutos Orscollion, Lord of Gluttony (470)
 • General
Blissbarb Archers (150)
Blissbarb Archers (150)
Blissbarb Seekers (160)
Symbaresh Twinsouls (260)
 • Reinforced

Regiment 1
Syll'Esske, the Vengeful Allegiance (220)
Blissbarb Seekers (160)
Slickblade Seekers (190)
Slickblade Seekers (190)

Faction Terrain
Fane of Slaanesh


Created with Warhammer Age of Sigmar: The App
App: 1.4.0 | Data: 181
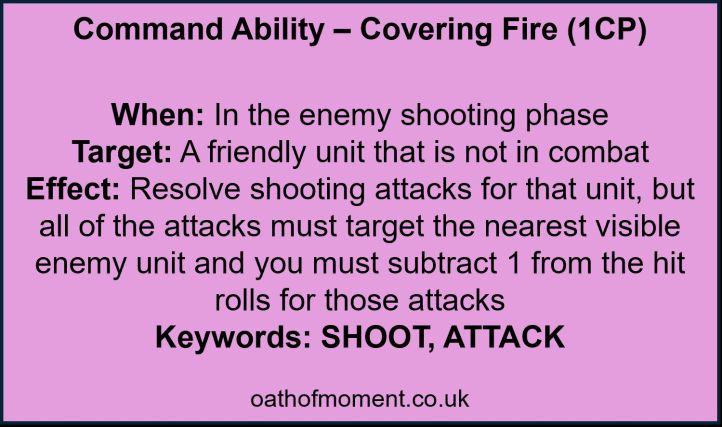
So there are a few bits that I think are important to call out as we explore the list. I’m going to start with one of the more controversial choices. The Blissbarb Archers having been split into two separate units. Up until this list I’ve mostly ran them as a block of 20… occasionally being greedy and including a second block of 20 as well but whilst there are definitely benefits to do so – particularly with Covering Fire:
The changes to Priority Target and the way this list plays make me inclined to give the units of 10 some more games. What I tend to find is I get a good turn or two out of my 20 Blissbarbs but eventually my opponent is going to be able to get hold of them and if I have a unit of 20, they tend to make them a priority. A unit of 10 will provide more of an annoyance than be a full on assassin unit like the reinforced block, but they’re a bit more likely to be left unmolested as they’re just not as sexy a target as some of the other things in this list. Seeing as they’re made of paper, I don’t think I’ve ever had the reinforced unit really survive once people have gotten hold of them, but again if the two units are working independently there’s an argument you might be able to sustain the damage (or some of it at least) for a little while longer. These are usually going to be deployed towards the main bulk of this list that is provide by Glutos, Syll’Esske and the Twinsouls – using their sturdier companions as a buffer to keep themselves safe for as long as possible. If we want them to be, both units can be made Euphoric now that we’re a little less terrified of risking this.
There’s also a lot of cavalry in this list. This could have been a cavalry heavy list archetype in fact! Generally, I split these units off into two wings, with a unit of Blissbarb Seekers and a unit of Slickblade Seekers in each. These tend to gravitate to the flanks but depends on the battleplan being played and any clues the opponent gives during deployment about where they want to be.
Looking at the Slickblade Seekers, the MSU principle here is important to the choice of unit size. You could reinforce the unit and they become incredibly scary, especially on the charge. However, it’s a threat that can be countered a little easier and can only be in one place at a time. 5 can be a tad swingy but they’re an amazing unit for bullying the right targets. If they’re Euphoric and depending on the target, have had Sadistic Spite cast on them they get to be suitably scary as a unit of 5.

What you also want, if you can make it happen, is either Overwhelming Acquiescence or the Fane’s Damned Conduit rule supporting the Slickblades:
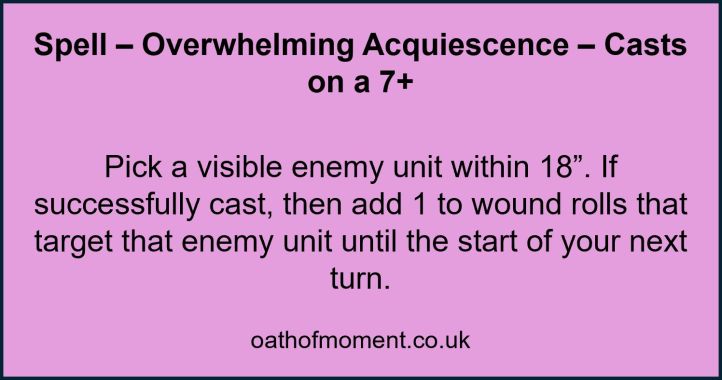

4+ to wound always feels rough I find as you’re just chucking away half of the hits you got on the first roll! When Euphoric with Sadistic Spite, 5 Slickblades cause an average of 13.17 damage to a unit with a 4+ save. If you throw a source of +1 to wound in there too it jumps to 14.94 and if you throw All-Out-Attack on top (which helps the Seeker mounts Companion attacks too) that gets to a lofty 17.94 damage into the same target. There are a few key breakpoints there for me, getting to 15 is important for dealing with similar enemy cavalry units of the same size – taking it past that allows a little more breathing space for the dice to work their capricious ways without totally ruining your plans. Then if you can start to get to 20 you’re looking at a unit that can go into possible hordes or smaller elite infantry units and have some joy. Fully buffed, the 5 Slickblades do 14.53 damage into a 3+ save unit so still risky to send them Varanguard hunting but if you’ve been able to start chipping away with your shooting etc the Slickblades can certainly punch up!
Their Unrivalled Velocity rule is great for helping them to make the charges you need whilst keeping your Command Point economy in a good place

This also makes them really great choices for the Counter-Charge command ability.
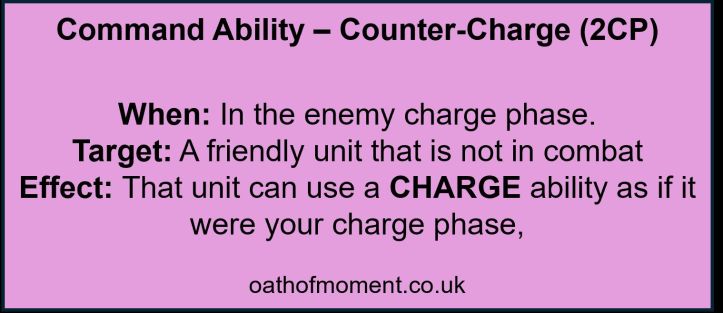
With Counter-Charge you tend to have slightly less control in setting up their charge but I like to set traps for enemy units where the other cavalry unit in the wing will be in the slighlty riskier position and if they end up receiving a charge, you can send in the Slickblades to suddenly make that combat a worry for them. You have to pick your targets well as there’s a much greater chance that your Slickblades won’t be fighting first in your opponent’s turn (if they’re sensible) so it works best on turns where they’ve got other high priority combats they’ll want to resolve first or when they’ve made opportunistic charges to try and shut down the shooting from your Blissbarbs or Blissbarb Seekers not realising the world of pain they may have opened themselves up to.
Slickblades are also a great target for Power Through with their high Health characteristic

This and the Reckless Haste ability from Seeker Cavalcade give you lots of opportunities to get your Slickblades back out of combat and this is important because the damage output on Slickblade Seekers is so much better on the charge!
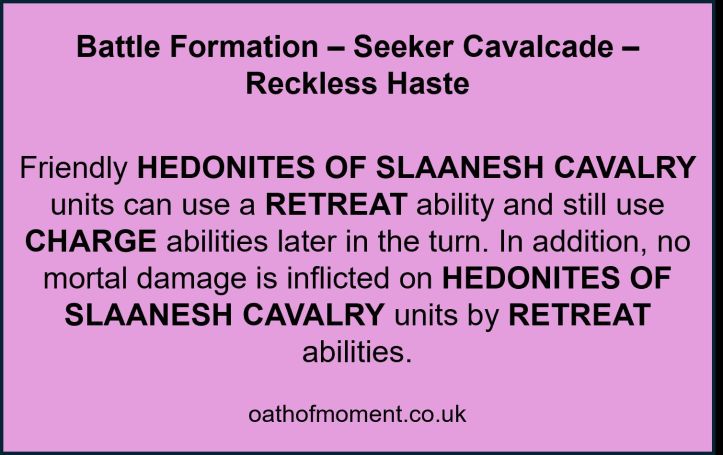
Blissbarb Seekers gain a little less from Reckless Haste, however, they generally don’t want to be caught up in combats so being able to extricate themselves without taking the damage for Retreating is useful even if it’s a shame that this doesn’t give them the ability to shoot after doing so.
I’ve mentioned this before, but I really love Blissbarb Seekers.They’re well priced for 20 wound units, they have a decent shooting attack that is buffed for doing what you want to do – hunting down units camping objectives – thanks to Glory Shots:
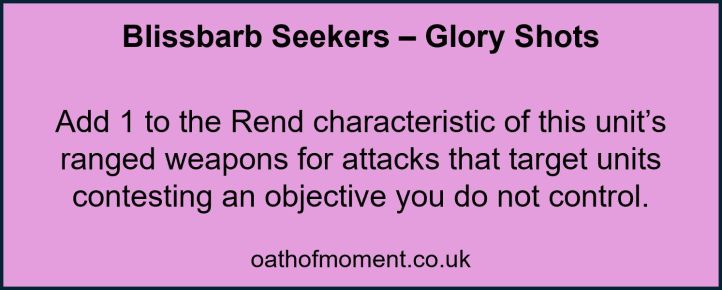
When Euphoric, they’re also pretty effective damage dealers and gaining the ability to Run and Shoot AND Charge isn’t to be underestimated as it allows them to bully the sorts of cheap units your opponent might want to have guarding backfield objectives. It also allows them to cover a potentially pretty huge distance – especially with access to Power Through. This means the unit could conceivably cover 12″ (Move) + D6″ (Run) + 2D6″ (Charge) + 3″ (Pile-In) + 12″ (Power Through) in a single turn – that’s 29″ – 45″ of ground with some shooting somewhere in between all that! Don’t forget, your Slickblades could be covering the same distance just minus the shooting – but instead boasting some terrifying combat power!
Hopefully this starts to show where the real value is in these cavalry wings – they can cause damage, plenty enough to pick off the weaker units that tend to be put out on the flanks of the battlefield and they can play a massive part in scoring you the Victory Points you need to win a game.
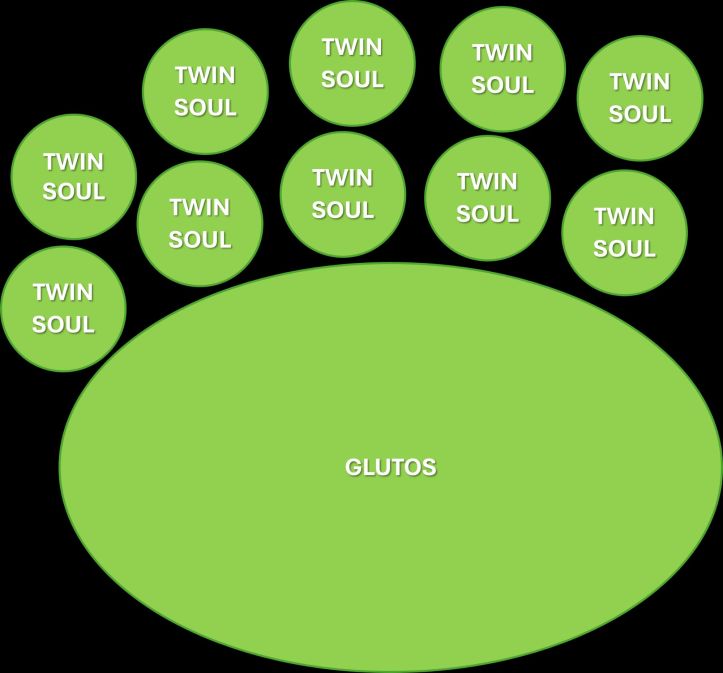
These 6 units (4 Cavalry units, 2 archer units) are the real MSU power of the army, they’re off making a nusiance of themselves, bullying weaker units, grabbing objectives and scoring victory points but what makes the list work is the anchor allowing them to go off and do their jobs.
We’ll start with Glutos who I’ve written about previously, in the Control Shenanigans list archetype, and a lot of that will be repeated here as he’s playing a very similar role. Firstly, he supports the objective game that your MSU units are playing if he’s nearby thanks to his The Grand Gourmand rule:

Everything in this list has the SYBARITE keyword, including Syll’Esske! First Battle Round, thanks to Starter, you can help get your units a little bit closer to where they’re needed. Second the Control Scores of units near to Glutos get boosted thanks to Main. In the third Battle Round, with Dessert, you’re adding 1 to hit rolls for unit’s attacks – if they’re still around this also applies to the shooting attacks on your Blissbarbs for example. From Battle Round 4 onwards, with Digestif, melee weapons carried by SYBARITES get an additional Rend which might help to remove the last stubborn remnants of your opponent’s force.
Glutos also has a really effective spell in Crippling Famishment:
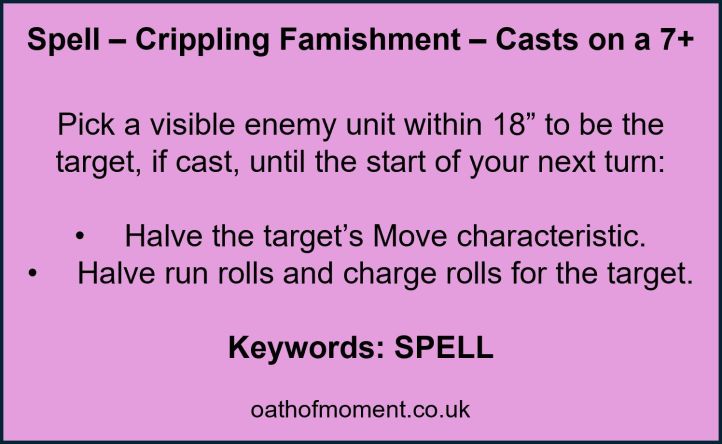
This list is surprisingly fast and having a way to neutralise an enemy unit that may be able to match you can be incredibly useful. This is even more amusing on big scary units that lack a great deal of speed, or units that are screening a scarier threat that now can’t clear a path to let them through. At a 7+ to cast it’s probably not a great pick for Magical Intervention but it definitely has some power play in ruining your opponent’s plans to score a Battle Tactic – not a one you can count on necessarily but if you’ve got casting bonuses up for Glutos and the CP to spare I can think of worse things to chase than an average dice roll chance to stop your opponent getting 4VP!

Crippling Famishment has been a great spell for as long as I can remember and has provided many happy memories, loke kiting Gotrek around (when he was at his absolute worst!) as he’s having to move 2″ a turn chasing Hedonites or slowing down big expensive models like The Glottkin or Mega-Gargants.
Gorge on Excess is also a really great rule and has some extra value in this list with Glutos’ mate Syll’Esske also able to benefit from it:

Usually, Glutos is using this on himself but Heal (6) can be equally valuable on Syll’Esske when needed and even on your Seekers potentially (obviously they won’t gain the full benefit of 6 but if your characters are at full health it’s better than just wasting the ability!). This can make it a real pain for your opponent to get rid of Glutos, especially when it’s combined with a few other bits in this list.
Moving onto the Twinsouls, although again, not the first time I’ve covered them and they’re playing a similar role here to what they have in previous articles. I will point out that this list was originally more MSU with the Twinsouls separated out (and the Blissbarbs combined) but through the games I’ve played I’ve reached the conclusion that if you want these to be an awful anchor unit for your opponent to have to deal with, that works best with a Reinforced unit of 10. This unit is chosen for the Bodyguard rule from Honour Guard and they stick to Glutos as much as is possible:

This rule is a massive part of why this bit is the anchor of the list and how it allows the rest of the list to go off and do it’s thing! It pairs up beautifully with the Twinsouls’ Ego-Driven Excess rule:
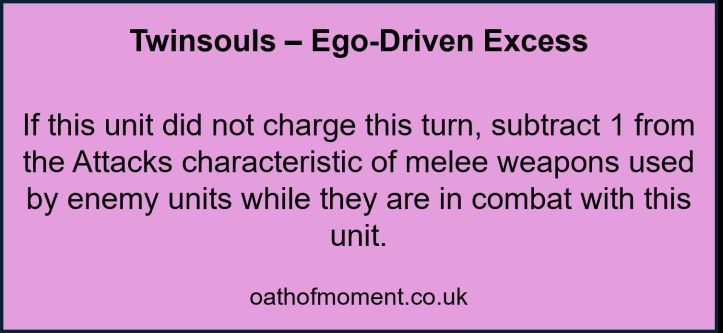
Together, these rules help to neuter a lot of scary units. It’s dependent on Glutos being in combat alongside the Twinsouls and that they haven’t charged. In those conditions though, units are losing two attacks per model. This is especially brutal to hard-hitting elite units that rely on the quality of a few attacks per model. Units like Chaos Chosen, for example, see their combat output reduced to 1/3 of what they’d usually be able to put out!
How you set the Twinsouls up is important in allowing you to get the most from Ego-Driven Excess and Bodyguard. It needs to be as close to impossible as you can make it to get into combat with the Twinsouls and not also have dragged Glutos in (and vice versa). This ensures that you benefit from both of these rules when you’re charged and it also gives you two decent units in combat with the charging enemy unit. I find this is usually easiest by having Glutos sideways on and ranking the Twinsouls up along one of the longer edges of his base but it can also depend on the terrain for example. Depending on the table, you may have opportunities to funnel enemy units in such a way as to make this easier for you. Glutos’ base is wider than 3″ most of the way along so you’re likely going to have a flank that enemy units could get into that would avoid the Twinsouls so they may be able to work around the Twinsouls’ Ego-Driven Excess even if not the Bodyguard attack penalty.
Obviously the quickest way to get around this is to remove the Twinsouls. Units that can cause damage without being in combat (shooting for example) are the biggest worry for Twinsouls as they do have a little more protection once in combat thanks to Fiendish Reflexes:

What’s worth noting is the ward save isn’t just for combat attacks, Twinsouls get more survivable once they’re in a combat (and they haven’t charged this turn). This makes the Twinsouls sound a completely defensive unit but they can also put out a decent amount of damage when needed. If Euphoric with Sadistic Spite they put out an average of 13.67 wounds into a 4+ save so there’s no reason not to charge them in if there’s a suitable target, if they remain in ongoing combat they’ll get their bonuses in future turns, Glutos can join them, adding a further 7.78 average damage to the mix into that 4+ save unit.
What about Syll’Esske then? Well it’s worth flagging up front we’re not getting full value from them as we lack a Daemon unit to be able to make use of the Deadly Symbiosis rule

It’s a nice rule and when you have some Daemons in your list too it can be handy to dish out All-Out-Attack twice but often it takes more work to set it up than you gain benefit from, at least that is my experience in games so far. Nice to have though.
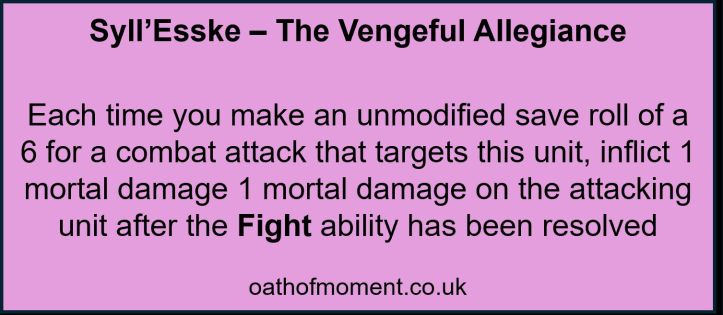
Vengeful Allegiance is a little more useful with the outside chance of doing some extra damage back to attackers with saves of unmodified 6.
What Syll’Esske really brings to the list is being a fairly mobile beatstick and a wizard in one. Their signature spell, Subvert, is especially useful:
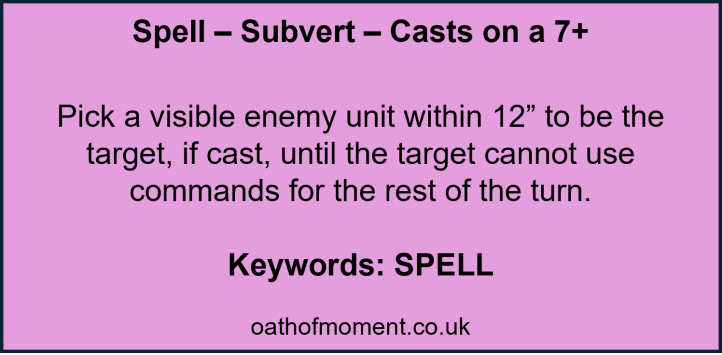
So much awesome! Switching off All-Out-Defence or Counter-Charge or Covering Fire etc can be potentially massive, allowing you to force through the extra damage you might need to remove a target or to limit the amount of damage coming back at you. Paired with Crippling Famishment on Glutos, there’s a fair bit of control potential in this list, allowing you to lock units down or severely limit their effectiveness. I love Subvert to stop a depleted unit getting to use Rally in your Hero Phase or Redeploy in your movement phase before you charge or shoot it later in the turn to eradicate it.
I tend to have Syll’Esske stick with the anchor of the list to begin with, but often they end up on little solo missions dealing with annoyances or small Heroes. If they remain near enough to Glutos, they can be risked on targets that don’t have the damage output to remove Syll’Esske in one go.
It’s worth also pointing out the choice of Manifestations for this list. I’ve gone with the Aetherwrought Machineries lore mostly for the Chronomantic Cogs and their Decrease Time Flow effect within the Mechanisms of Time abilitiy

Putting Wizards within 12″ of it means they’re at -1 to hit. This means that Glutos is potentially at -1 to hit and enemies are at -2 attacks when getting into combat with him and his Bodyguard, this should help further in making our anchor really tough to break down. Syll’Esske being a wizard can benefit too if you summon this within reach of both.
The Aethervoid Pendulum is also really useful with its ability to move in any Movement Phase and to move into combats. Whilst the direction of its movement means that a canny opponent can work around it, it has the chance to tie stuff up and deny charges which is really great in a list like this one where we want all the combats to be on our terms.
Whilst I’ve probably covered it already as we’ve looked at some of the units (and will again when we look at Battle Tactics shortly) I tend to think of the army as having 5 or 6 divisions within it.
- Glutos and the Twinsouls are the central anchor of the list. They’re the anvil upon which your opponent will hopefully break. This tends to mean being fairly central.
- Syll’Esske are part of this same group but have some flexibility to wander off as the battle progresses, this depends a lot on the amount of shooting your opponent has, as they might need to remain close to another unit to protect them. This is usually the Twinsouls but they may wander in the company of Blissbarb Archers to hunt their quarry.
- The cavalry wings. There are two of these usually, each consisting of 5 Blissbarb Seekers and 5 Slickblade Seekers. These usually start out on a flank each for Battle Tactics and bullying purposes. They’ll start off keeping together but will separate out as needed as they can all work fairly independently.
- The Blissbarb Archers, these serve a few purposes – they provide some ranged threat to draw your opponent out to you, they pick off key targets of opportunity, they’re squishy and tend to make an attractive target for your opponent and they can help thin the numbers of things in with Glutos and the Twinsouls – that anvil is tanky because of how much they can neuter an enemy not because they’re actually tanky (never forget, we’re playing Hedonites!) so you don’t want any of the combats to be fair! With their numbers, the Blissbarb Archers also benefit from being close to Glutos for Control score shenanigans so I do tend to find they remain near the core of the battle.
The main thing with this list (and in truth with Hedonites in general) is to not over extend. Fair fights aren’t something that suits us, so, avoid them! If I can score without fighting then I try to do so. Sometimes you’ll have to lose a unit, try and make the trade worth it in either removing a threat from your opponent or securing your scoring either through objectives or battle tactics for yourself or denying key scoring or scoring units for your opponent. My preferred play-style, and probably even more so with this sort of list is to avoid engagements early on, unless they’re either weighted in your favour, your opponent has left a key unit of theirs vulnerable, or doing so allows you to score the points you need to stay in touch. I tend to make myself comfortable being the Underdog for at least a couple of turns. There aren’t many match-ups where I think Hedonites can just go hell-for-leather and fight combats on multiple fronts – there are probably better armies for that style of play at the moment. What Slaanesh can do well is use their speed and manoeuvrability to help dictate combats and keep the game tight until you’re ready to close the noose. Meanwhile, you can use your shooting to try and weaken key units and your mobile cavalry to pick off isolated units. Very rarely will I be looking to score any points in the early turns for the “if you control more objectives than your opponent” condition unless doing so can be done with minimal longer term risk.
Let’s look at the Battle Tactics and some possible approaches to scoring them with this list.
First up, Take the Flanks:

This is a relatively straightforward Battle Tactic for this list on most Battle Plans. Blissbarb Seekers are the obvious choice of unit to send off chasing Battle Tactics like this one and Take Their Land as they can still potentially impact the rest of the battle with their shooting whilst doing so – although be aware that if you’re within shooting range then you’re also in potential Counter-Charge range so sometimes it’s worth sacrificing a turn of damage to ensure you claim your 4VP! That being said, if I’m going for this early in the game, nothing wrong with sending some Slickblade Seekers after it instead, whilst waiting for the right charge to open up for them. You’ve got the speed in the list to probably hold onto this one if you want to, however, I tend to quite like it as a first or second turn Battle Tactic so usually deploy with a view of going after this if I choose to Turn 1 – whether I actually do will depend on what my opponent does, who goes first etc. There are exceptions to this of course, Battle for the Pass is a Battle Plan that can make this really tough to pull off depending on what your opponent does and almost impossible in Turn 1 – although even then, I’ve already mentioned the silliness of a potential 29″ – 45″ range on your cavalry through Command Abilities and Euphoric when discussing the Blissbarb and Slickblade Seekers earlier, but hard to see that as being something that wouldn’t probably be overreaching on Turn 1, however, if your opponent has perhaps put one lonely unit out on a limb somewhere to score this in their own Turn, perhaps then it could be a thing!

Image property of Games Workshop. All rights reserved.
Next is Seize the Centre:

If you’ve read any of my other Hedonites Tactics articles you’ll know some of my thoughts on this. In theory it’s a good early Battle Tactic, however, there remains a lot of potential counter-play to it through Counter-Charge etc. and more importantly you’re being forced into shunting stuff forwards and that might not suit you longer term. This list can do this fairly well with Glutos, Syll’Esske and the Twinsouls on a lot of maps. The Grand Gourmand gives you the speed boost to ensure that you can usually make it to the middle and as the anchor of your list they should be able to stand up to a lot of the stuff that will make its way to them from the off (again not so much through being tough but by stopping most good units from getting to actually be as good!). On maps like Shifting Objectives and The Jaws of Gallet where you have a bit more space across the centre between the armies this can have a little more value as a Battle Tactic if you’re going first – although on those maps Take the Flanks also becomes easier to score. I tend to take the view that Glutos, Syll’Esske and the Twinsouls are going to end up in the middle of the board and look to score this later on in the game but that might be me being a tad over-cautious! You certainly could also throw your cavalry at this one early on, so you’re not risking the slightly more valuable anchor units, but your cavalry are no more difficult to catch than the other units in your opponent’s turn…
We also have Take Their Land:

Another Battle Tactic where we don’t have to engage with the opponent… I’m a big fan of avoiding risking a game of Warhammer breaking out as much as is possible! There are some battle plans where this is easier to score than others. It can be quite a good one early doors if an opportunity presents itself as again your Cavalry in particular are more than capable of zooming across the board to do this if needed! It tends to be one I save though and like to have as a near-guaranteed choice for later in the game when some of the other options might start to feel a bit dicey or require a lot of commitment. Always a one to use on a turn whilst you’re softening up the target for a kill-based Battle Tactic like Slay the Entourage say…
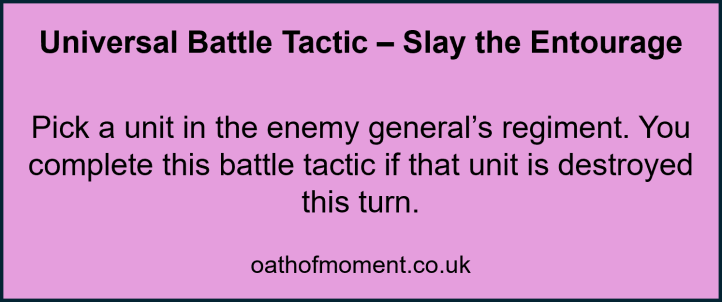
With the change to Priority Target mentioned above this one might get a tad easier in that there’s slightly less incentive to spread units into regiments other than the General’s (and if they are, at two drops this list is probably getting to choose priority or they’re running a very small elite list that this could run rings around even if it might never want to actively engage it!). This one tends to be more a targets of opportunity pick for me, but I certainly keep an eye on what’s nearly dead or sufficiently vulnerable that is in the General’s Regiment and if it’s of sufficiently reduced threat will hold off killing it until I’ve picked this as a nice easy Battle Tactic. What I have found is that the Blissbarb Archers and the Blissbarb Seekers are very good for helping score this, especially as you have the option of charging in afterwards if you really need to get the last wound onto something. This one does invite some counter-play though with Redeploy or Rally in particular potentially moving stuff out of your reach. Always best if you can to build some redundancy into your choice of target here so that you can still potentially remove it in other phases with other units if they dance out of range for one. Again, always remember that the enemy General is in the General’s Regiment and will sometimes be the best pick here!
Then we have Attack on Two Fronts:
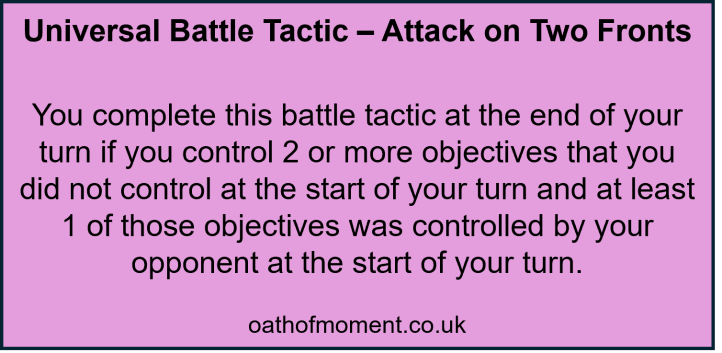
This one technically doesn’t require us to interact with our opponent as they don’t need to be on the objective (of theirs) that you go after, it just needs to be under their control. This can be a good one early in games, particularly when a screen or skirmishing unit has jumped up to grab an objective ahead of the main line and your opponent either won’t be able to then keep that objective or won’t risk the unit sticking around for a fight. I tend to love Glory Shots from the Blissbarb Seekers to soften up a unit like that so that they can outnumber them and steal the objective from them but will always prioritise an empty objective over one I’ll have to fight for! Again, only one of the objectives has to have been under your opponent’s control. If you deploy accordingly the other one could even be an objective in your territory as long as you didn’t hold it prior – which can make this a good one when going second sometimes. Again there is some counter-play here for your opponent if they can secure the objectives you target, however, you don’t have to declare the objectives you’re going for with this one so you can potentially build in some redundancy by going after multiples if your force disposition at that point of the battle allows!
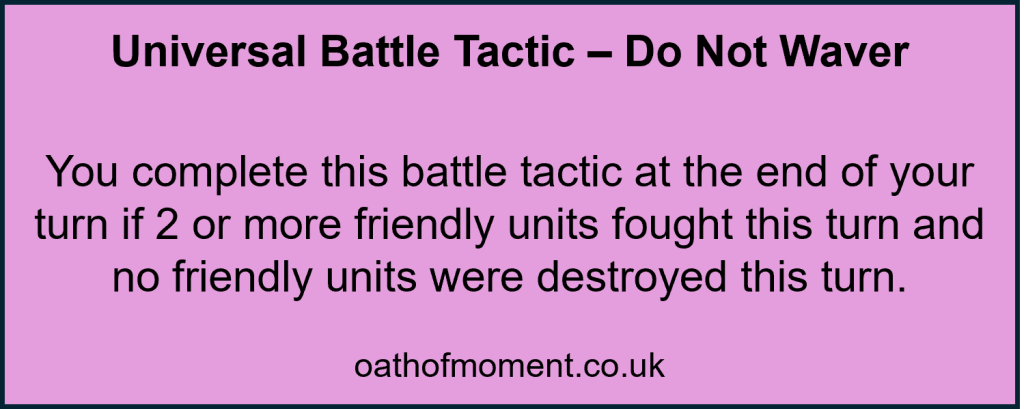
The last of our universal Battle Tactics is Do Not Waver. Again, I’m very rarely a fan of this one. There’s so much counter-play available through Counter-Charge or Covering Fire in particular, to put one of your units you might have thought safe, at risk. Throw in the fact that Hedonites just aren’t a particularly tough army. I think I’ve only ever picked this once or twice in my games of 4th so far and I’m certain that I only picked it because I knew I had no Battle Tactics I could actually score on that turn and it would likely be one I wouldn’t miss being able to pick in later turns!

Offering of Carnage definitely requires some interaction with your opponent, however, there aren’t any stipulations about the manner of these enemy units’ deaths so that’s a definite positive as potentially our Blissbarb Archers and Blissbarb Seekers might have some likely candidates already close to death. This can be a tougher one to score early on, however, if there are some prime targets amongst your opponent’s screening units, for example, then there may be some value in this. Another target of opportunity one for me, if there’s scope for this then it’s a great pick, otherwise, it can be a tad risky for causing is to over-extend to my mind. There’s a little bit of counter-play but as you don’t pick the 2 (or more) enemy units it’s mostly the standard stuff that an opponent would tend to use to stop their units dying anyway including judicious use of All-Out-Defence!
The last of our Battle Tactics is Ordained Charge:
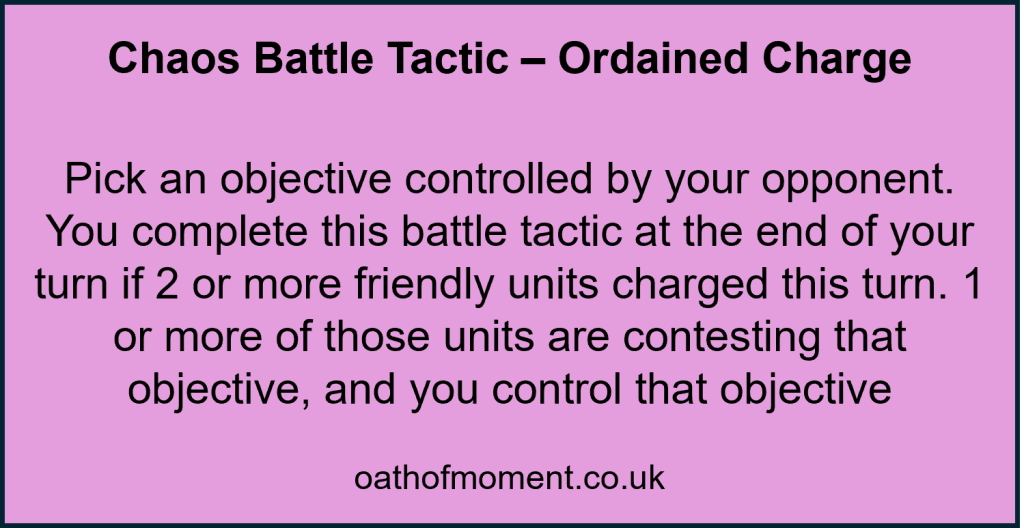
Again, this is one that I quite like because whilst there is a requirement to charge with 2 units, and therefore a requirement to engage, the main point is that the objective you picked for the Battle Tactic has to be yours at the end of the turn and be contested by at least 1 of those charging units. This means that you can make a charge into a heavily depleted unit (thanks to your shooting perhaps) with some Blissbarb Seekers and steal an objective in the process or your Slickblades could steamroller something and do the same, meanwhile, your other charge doesn’t have to be related to objectives at all. There’s some counter-play as you have to specify the objective so there’s options around Redeploy and Counter-Charge to help your opponent up their numbers on the objective or Redeploy and Covering-Fire perhaps to make your charges more difficult and to perhaps limit your ability to kill enough enemy models to capture the objective. It’s not always an easy one, but there’s usually a point in the game where this feels achievable, from my experience.
Overall, you might have noticed from this and my other articles on Hedonites, my perfect game sees me picking Take the Flanks, Take Their Land, Attack on Two Fronts then maybe Seize the Centre or Ordained Charge so that I can max my scoring without having to rely too heavily on the dice, but I’ll always look for opportunities to score Slay the Entourage or Offering of Carnage to spare me having to risk something like Ordained Charge or Seize the Centre if I don’t have to!
To MSU or Not to MSU?
As ever, these list archetypes aren’t to present you with a silver bullet of a list but to explore some tactics within the army in the context of a style or design theme. Personally, I really quite like MSU as a concept. This started way back in old Warhammer Fantasy – after reading an amazing blog post about Wood Elf MSU tactics (I really wish I could remember the details to link it as it had such a profound impact on the way I approached Fantasy – and probably a lot of wargames since!). I decided to try and create a similar approach using my other great love other than Slaanesh (in a fantasy setting) the Beasts of Chaos (or Beastmen can’t remember which they were being called at the time so many times have they changed back and forth!). Age of Sigmar is a very different game to Fantasy without the need for March-Blockers, Charge Re-directors and other such tech pieces that were a mainstay of the MSU approach there. So, could this list be played in a style less reminiscent of MSU? Totally! There’s definitely some value to be had in reinforcing some of these units rather than running them separately. 10 Slickblade Seekers have a damage output that not many things in Hedonites are able to get anywhere near. If you pile on All-Out-Attack, Euphoric, Sadistic Spite, and Overwhelming Acquiescence you’re looking at 28.28 damage on average into a 3+ save unit. Enough to keep units like Varanguard honest, especially when coupled with damage elsewhere in the list from shooting for example. Usually one of the arguments for reinforcing units is that they can get more economy from things like All-Out-Attack. Whilst this is true, in Slaanesh, it’s perhaps slightly less so than in some other armies. You can only use All-Out-Attack once, sure, but from Battle Round 3 onwards The Grand Gourmand is handing that out to all units in range of Glutos and if you wanted to lean into the Daemonic a little more, Syll’Esske can actually hand out All-Out-Attack twice with Deadly Symbiosis. Further than that though, you can make up to 3 units Euphoric, Sadistic Spite is an Unlimited spell able to be cast multiple times and whilst you can’t do the same with Overwhelming Acquiescence we do still have the other source of +1 to wound from Damned Conduit. It’s probably as much a “to taste” thing as it is anything else but whilst the threat of 10 Slickblade Seekers is a special thing indeed (watching them take out Greater Daemons and the like on the charge is definitely nice!) they can only be in one place at a time, and are slightly more prone to being fed chaff by your opponent and because of their increased footprint can be tied up a little easier without them all getting to fight. The 28.28 damage on the charge into a 3+ save unit is almost halved to 16.22 if the Slickblades are charged or stuck in a drawn-out combat (and that’s assuming they all get to fight which is much harder to do with 10 if you’re not controlling the charge).
You could do something similar with the Blissbarb Archers too, running them as a unit of 20. The below would be a perfectly valid Hedonites of Slaanesh list:
Not Quite So Many Slaaneshi Units (NQSMSU) (1950 points)

ARMY

Hedonites of Slaanesh | Seeker Cavalcade
Drops: 2
Spell Lore - Lore of Extravagance
Manifestation Lore - Aetherwrought Machineries

General's Regiment
Glutos Orscollion, Lord of Gluttony (470)
 • General
Slickblade Seekers (380)
 • Reinforced
Symbaresh Twinsouls (260)
 • Reinforced

Regiment 1
Syll'Esske, the Vengeful Allegiance (220)
Blissbarb Seekers (160)
Blissbarb Seekers (160)
Blissbarb Archers (300)
 • Reinforced


Faction Terrain
Fane of Slaanesh


Created with Warhammer Age of Sigmar: The App
App: 1.4.0 | Data: 181
Depending on your play-style this may be a lot better than the list I started this article with. However, I’m confident that the one at the start suits my play-style better. Which I guess is really the point of all of these tactics articles. They’re to give you some ideas, based on what I like and what’s worked for me, but the key bit is going to be putting your own spin on it. Lots of people hate Glutos – I love him, do I see that he could be better? Sure, but that’s true of everything! He certainly does the job I expect him to do more often than not and that’s what I’m looking for.
One final point I would add, I like Syll’Esske but I think if I had an extra 20pts I’d swap them for Synessa and have something a little closer to my Control Shenanigans list to really rev up the MSU list’s ability to steal objectives from bigger blocks.

Image property of Games Workshop. All rights reserved.
Let me know your thoughts on this and any experiences you’ve had using this or a list something like this one! Are there any other Hedonites units or styles you’d like me to explore in the future? If so, tell me in the comments!
Discover more from Oath of Moment
Subscribe to get the latest posts sent to your email.

[…] Part 4: List Archetype – MSU + Changes from the Balance Update […]
LikeLike
[…] Part 4: List Archetype – MSU + Changes from the Balance Update […]
LikeLike
[…] Part 4: List Archetype – MSU + Changes from the Balance Update […]
LikeLike
[…] Part 4: List Archetype – MSU (Many Slaaneshi Units) […]
LikeLike